


من الأهمية بمعرفة كيفية تغيير منطقة الوقت في بريدك الإلكتروني إذا كنت ترغب في عرض رسائل البريد الإلكتروني في منطقة الوقت المفضلة لديك.
يوصى باستخدام عميل البريد الإلكتروني Roundcube أو SquirrelMail.
ماذا تحتاج؟
قبل البدء في هذا الدليل، ستحتاج إلى ما يلي:
تفاصيل تسجيل الدخول إلى حساب البريد الإلكتروني الخاص بك.
أو بيانات دخول لوحة التحكم الخاصة بك.
الخطوات:
1- الوصول إلى بريدك الإلكتروني:
قبل البدء، يجب أن تكون قد أنشأت حساب بريد إلكتروني مسبقاً.
يمكنك العثور على برنامج تعليمي حول كيفية القيام بذلك هنا (وضع الرابط المناسب هنا).
كما يمكنك قراءة برنامج تعليمي لدينا حول كيفية الوصول إلى بريد الويب هنا (وضع الرابط المناسب هنا).
2- تغيير منطقة الوقت:
أولاً، إذا كنت تستخدم عميل البريد الإلكتروني Roundcube:
بعد تسجيل الدخول إلى حساب البريد الإلكتروني الخاص بك عبر عميل البريد الإلكتروني Roundcube في ويب ميل
ثم، قم باتباع الخطوات التالية:
انقر على الإعدادات أو الضبط (Settings) في الزاوية العلوية اليمنى من الشاشة.
ابحث عن خيار المنطقة الزمنية أو الوقت (Time Zone) وانقر عليه.
حدد منطقة الوقت المفضلة لديك من القائمة المنسدلة.
احفظ التغييرات أو اضغط على زر تأكيد (Save/Confirm) لتطبيق المنطقة الزمنية الجديدة.
ثانيًا، إذا كنت تستخدم عميل البريد الإلكتروني SquirrelMail:
بعد تسجيل الدخول إلى حساب البريد الإلكتروني الخاص بك عبر عميل البريد الإلكتروني SquirrelMail في ويب ميل،
يجب أن تجد خيارات الإعدادات في الشاشة الرئيسية للبريد الإلكتروني. يمكنك البحث عن خيار المنطقة الزمنية أو الوقت وتعديله وفقًا لتفضيلاتك.
باختصار، يمكنك تغيير منطقة الوقت في بريدك الإلكتروني عن طريق الوصول إلى
إعدادات البرعميل البريد الإلكتروني الموصى به هو Roundcube. يعطيك الخطوات التالية لتغيير المنطقة الزمنية في Roundcube:
بعد تسجيل الدخول إلى حساب البريد الإلكتروني الخاص بك في Roundcube، سترى نافذة مشابهة للتالية:
انقر على الإعدادات أو الضبط (Settings) في الزاوية العلوية اليمنى من الشاشة.
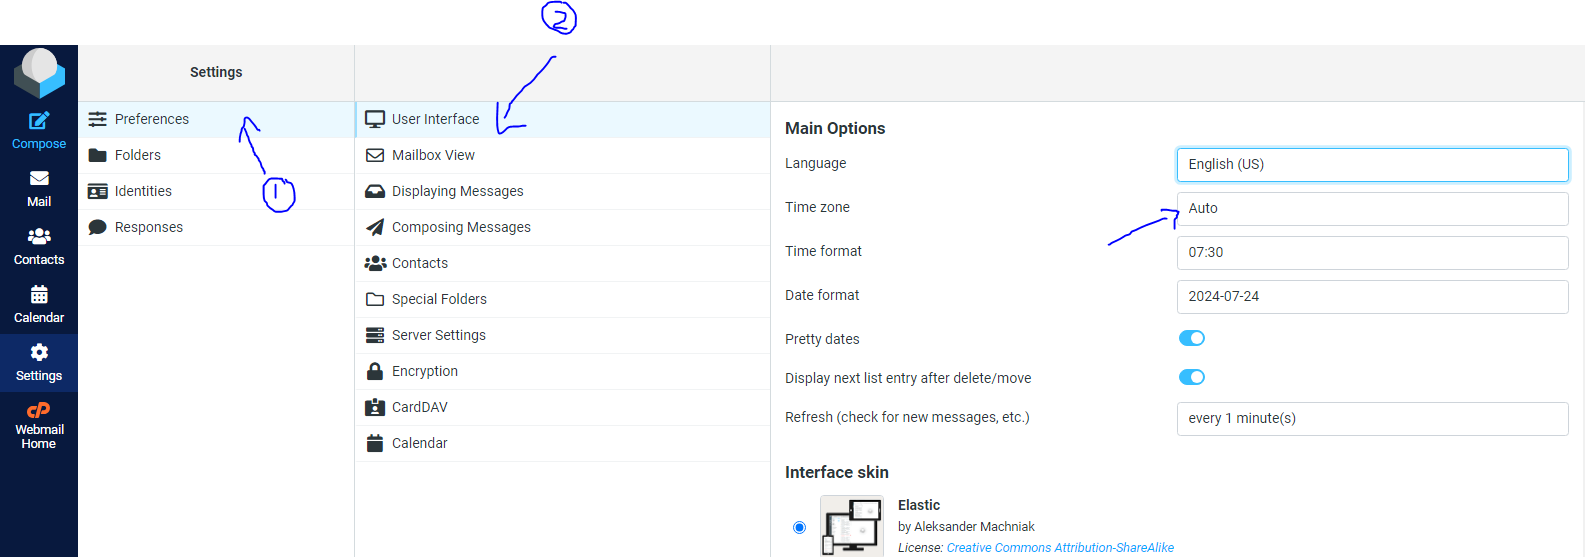
ابحث عن خيار المنطقة الزمنية أو الوقت (Time Zone) وانقر عليه.
حدد المنطقة الزمنية المفضلة لديك من القائمة المنسدلة.
احفظ التغييرات أو اضغط على زر تأكيد (Save/Confirm) لتطبيق المنطقة الزمنية الجديدة.
بهذه الطريقة، يمكنك تغيير المنطقة الزمنية في Roundcube لعرض رسائل البريد الإلكتروني في المنطقة الزمنية المفضلة لديك.
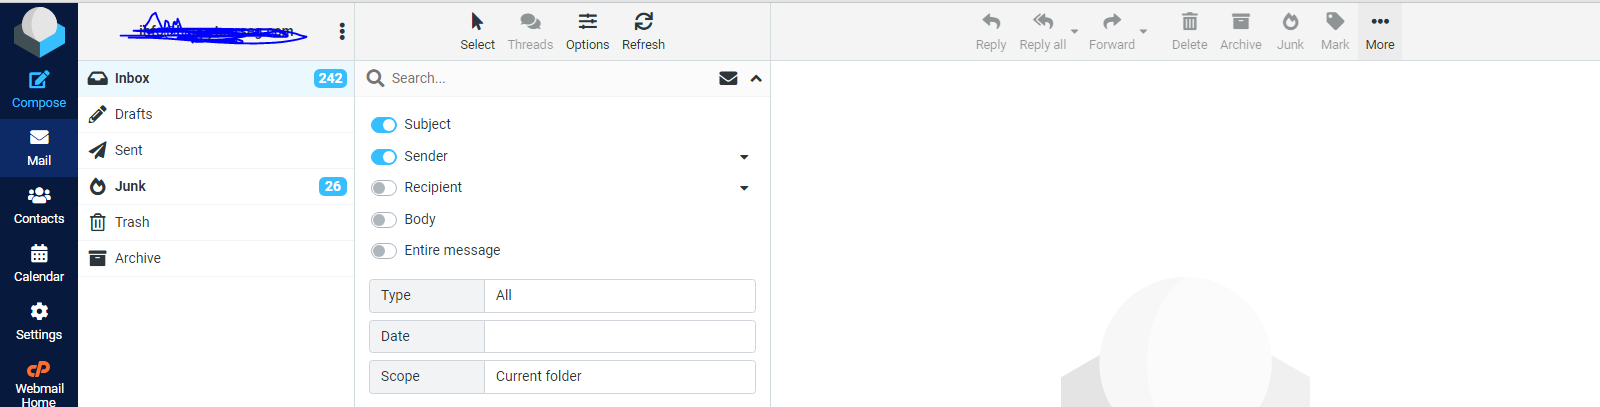
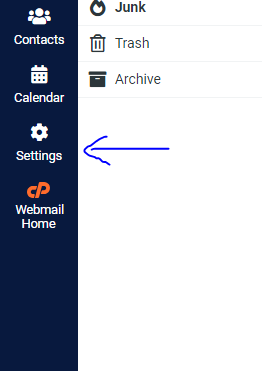
قم بالضغط على Settings هنا وسيتم نقلك الى هذه النافذة :
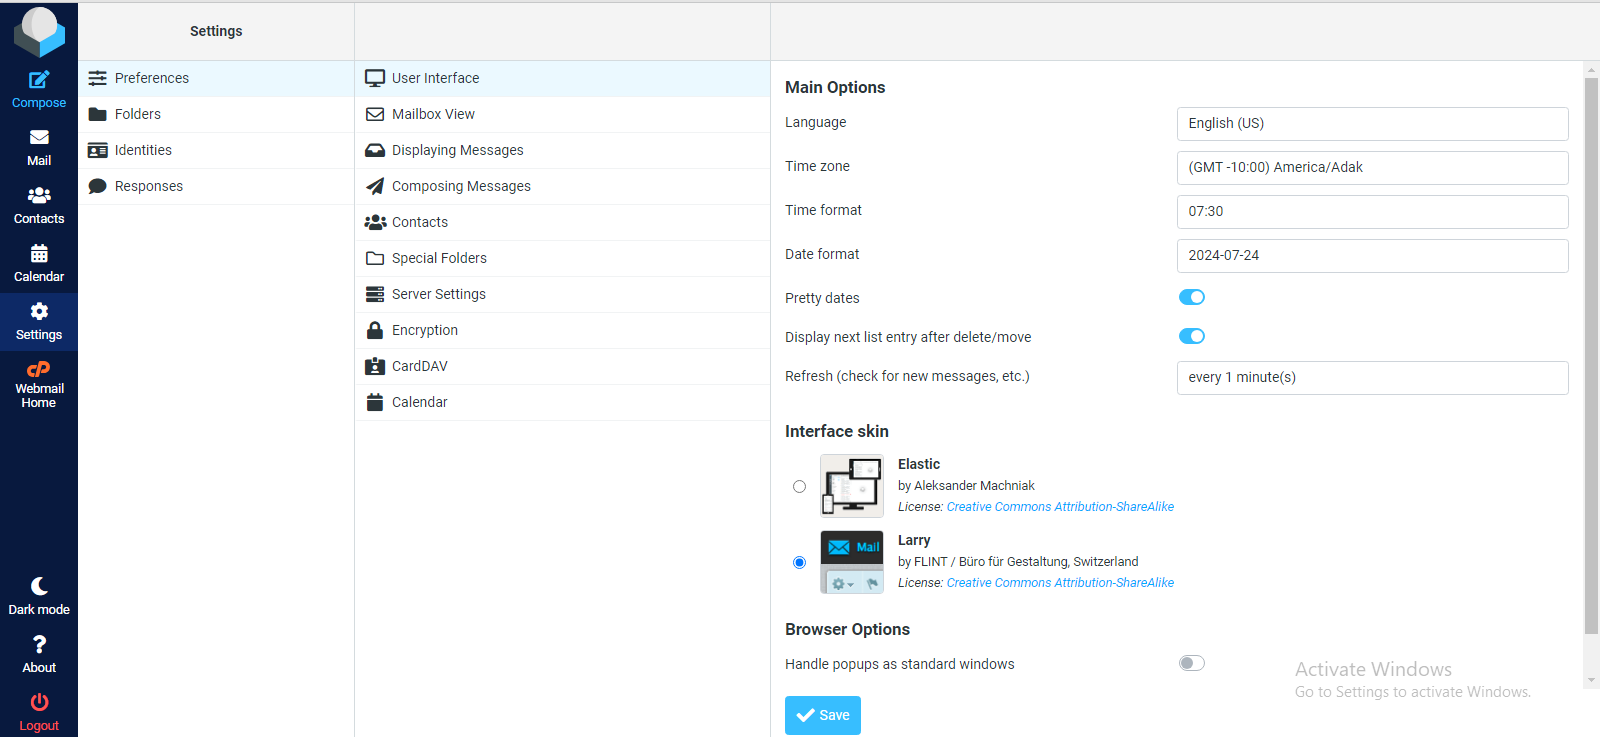
بعد اختيارك للمنطقة الزمنية المفضلة، انقر على زر "حفظ" أو "Save".
ستظهر لك رسالة تأكيد بنجاح تغيير منطقة الوقت.
بعد تسجيل الدخول إلى حساب البريد الإلكتروني الخاص بك في عميل البريد الإلكتروني Horde عبر واجهة الويب، اتبع الخطوات التالية:
انقر على "Settings" أو "الإعدادات".
انتقل إلى "Preferences" أو "التفضيلات".
انتقل إلى "Global Preferences" أو "التفضيلات العامة".
في هذه النافذة، انقر على "Locale and Time" أو "الإعدادات المحلية والوقت".
ستنتقل إلى نافذة تفضيلات المنطقة الزمنية، حيث يمكنك اختيار المنطقة الزمنية المفضلة لديك في قسم "Your current time zone" أو "المنطقة الزمنية الحالية".
بعد تحديد المنطقة الزمنية المفضلة لديك، انقر على زر "حفظ" أو "Save".
ستظهر لك رسالة تأكيد بنجاح تغيير منطقة الوقت.